Pages

Tuesday, October 25, 2011

Shoo Fly, Don't Bother Me!

To say the last week has been interesting would be an understatement. Last weekend we had Diego's brother as our first official visitor to the apartment. Tons-o-fun was had, and I'll share a few details next time, but today, I have something much more important to share. Quite frankly I wish it was as easy as 'shooing' them away! While D was driving to pick up his brother I thought I would get a few things done. I went into the guest closet to get some office supplies, and what do I find? Well, I wasn't really sure, actually because it scurried away too quickly for me to find out, but it was some kind of critter! In Texas, I figured it was either a lizard or a scorpion, and that last one means you know I wasn't going to chase after it! When the boys finally got home I made them dig around for it. Fortunately we found this little guy (forgive these pictures, in my terrified state I wasn't really trying to get great pics):


Whew! HUGE sigh of relief all around! It was just a little lizard crawling around in the closet. Although it might be creepy to have something wandering where you can't find it, they are pretty harmless and even it spiders, so I can deal with it. We let him go outside near a tree and he lived happily ever after. Fast forward two days and I was not so relieved when I found a second, more dangerous intruder. Enter: Scorpion.


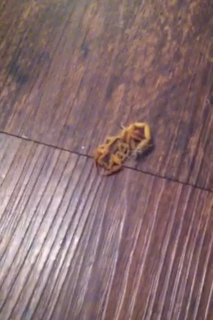
Again, a terrible picture, but this midwestern gal is not prepared to deal with this stuff! I threw a kitchen container on top of him until my hero came home and once again saved the day. We had heard that if you pour alcohol on a scorpion it will sting itself to death. This seemed like the easiest route, but we had no rubbing alcohol. The highest proof and nastiest stuff (we don't feel bad wasting something we don't like) was brandy. It had to do the trick. Or not. But it did get the little guy terrifying monster tipsy enough to not really know what was going on. After D poked at it with a stick for a while and I yelled at him to stop making it mad and just kill it already, he swept it into the dustpan, took it outside, and stepped on it. Good bye evil villain! The end!

Not so fast. Thursday night we found yet another intruder! And yet again, this one was more dangerous. Yippee! Thankfully I wasn't the one to find it this time. I probably would have had a heart attack at this point. Diego was headed into the bedroom to get his laundry when he heard an unwelcome scurry. Enter: Red Headed Centipede.


Not even he knew how to handle this one. At this point, all we could do was put a bucket over it with something heavy on top and stay with friends for the night (Thanks J and C!!). After some time spent away from the 8" monster D felt brave enough to catch him in the jar you see him in above. I'm still not quite sure how it happened because I was too scared to watch in case something happened. If you're not sure what they do, google it. Or don't, you won't sleep for days. D named him Thompson against my will, but he is no longer with us, as he met quite the demise, details of which I will not go into.

We've been ok since, but sleeping has been a little rough. Bed checks anyone? Shoe checks in the morning? Not exactly my idea of a great living situation. Unfortunately we're stuck. I'll of course let you know if any of these villains' little friends try to stop in for a visit. Until next time, stay safe and watch out for dangerous critters!

Monday, October 17, 2011

Home is where?

Last week I told you I'd be filling you in on some new artwork happening in the living room. Well, it's here and it's up on the wall and we couldn't be happier. I ordered two great prints on Etsy from B and A Prints.


We chose Wisconsin for where I grew up, and Mexico for where D grew up. The names in red are the cities where we grew up. 


As soon as they arrived I ran to Michael's to buy some frames, 50% off coupon in hand, of course. I wanted something that would make them more of a show so I opted for the big chunky frames in 11"x14" with a matt that would bring it down to their 8"x10" size.


They look a bit small on camera but are perfect in person (apologies for the bad photo, lighting is difficult in there), especially since I'd like to keep adding more art. If you like anything from B and A Prints I'd definitely recommend it, from order to my doorstep took about 4 days and that was because I took a little long to reply to some of the messages for my custom order (getting our hometowns in red was a customized but free add-on). I hope you're enjoying your fall season. Have you added any new art or fall decor?

Thursday, October 6, 2011

Laying It Down

In the last week something has changed around here. Something great. Something I love. Something I've been waiting for since June! So, what exactly is this change, you ask? Well, I'm happy downright giddy to report that we got a rug in the house. Throughout the summer I had been scoping out this rug from West Elm.


Trust me when I say this was a long process. It took me a while to exhaust all of my resources for rugs, and truthfully, I can't even remember half the places I looked. Other rugs were either the wrong color, wrong style, or had a pattern that just wasn't the right size. But throughout the process I kept coming back to this one. At the end of August I finally bit the bullet and bought the rug after I got an email about a promotional sale. And then the sadness set in. My one, true, rug love was on back order for a whole month! I had waited 2 months to order, I could wait another for its delivery. While I waited I was slightly nervous because I had never seen it in person (our local store closed about 6 months ago). You never can tell what that color is really going to look like from a computer screen. Now is the time when I tell you that I'm thrilled to pieces with the big guy and so are my little feet with something slightly softer to rest on. So here go the pictures for all you curious kids. Let's start with the before picture.


You can see how bland it is with all those dark neutral colors and the off-white walls. Blah! We got these great lamps from Pier 1 last Christmas and D, that devil genius suggested we fill them with some Spanish moss. The texture is a fun added layer and set the stage for our rug.


And now here is the main event, right where he belongs:


I hope you love the color and pattern as much as I do. Come back soon for a post about how I'll be filling up those sad, empty walls!

Monday, September 26, 2011

Chalk-It-Up

This past weekend I was just itching for something creative to do. I needed a break from sweets after last week's cupcakery, so I thought something a little craftier might do. I'll admit I was a bit stuck until our visit to The Container Store. We went for the sole purpose of browsing, knowing we'd find something to make life a little neater around the house. As soon as we heard these little guys just screaming our names:


I'm a sucker for these things and I couldn't resist them at these prices. They warm my heart mostly because my grandparents used to keep candy in jars like these when I was growing up. Chocolate-filled Caramel Nips anyone? I also love how well these jars seal. My boyfriend and I both agreed they'd be perfect for storing flour and sugar.

For some reason I always loved that my mom had two special containers set aside specifically for these baking items. I didn't love that I could never seem to remember which was which without having to open the jar. The perfect solution at hand was to use chalkboard paint to put a patch on each jar where I could write its contents. I figured the chalk offered a great solution in case I later change my mind and want to use them for something else (cotton balls, clothes pins, craft supplies, so many options!). I already had all of the other supplies I'd need so it seemed like a winner of an idea. Here are the basics that I used:


My first step was to use the masking tape to tape off the area that I wanted to have the chalkboard finish. I considered doing a cute design on the corners or the top, but thought it might be too country for our taste, so I opted for something simple instead. There were no precise measurements, I just freehanded the tape, peeling it off and sticking it back on if it didn't look right.


The top curve of the glass created a nice arch in the tape and I felt ready to go! I happened to have a bottle of cheap chalkboard paint from the craft store lying around, but something more heavy duty from the home improvement aisle might be a better option if you're buying new. The directions in the bottle recommended two even coats with an hour of dry time in between and 24 hours to cure after all coats were on. After I started my first coat it was clear I was going to need a few more coats.


I think it's just because I was painting it on glass, but the thin coats worked to my advantage seeing as I'm not patient enough to wait an hour between coats. I continued with coats like this, setting them outside in the sun for about 15 minutes and then put the next one on. The end product required somewhere between 6-7 of those super thin coats. Once the last one went on I used my X-acto knife to score along the tape line and peeled it up right away. There's that lack of patience again!


After that grueling 24-hour curing process I lightly rubbed a little chalk dust on them as per the directions and wrote to my little heart's content. After this I decided it might be a good idea to seal things up to make sure nothing would scrape or peel off the jars. I had some Krylon sealer in the house in a clear, satin finish and it did the trick. Be sure to tape another border around your chalkboard so you don't ruin the finish on the rest of your jar. You can see a bit of the border I left in my final picture on the flour jar. I then excitedly ran to the kitchen to fill the little guys only to realize we were out of flour. But there was sugar, so I was still happy, and got this for my final product:


I'm so happy with how they turned out! I hope this inspired you to do something to make storage a little more fun. Happy chalking!

Monday, September 19, 2011

Peter, Peter, Pumpkin Cupcake Eater

Well, it's time for my first official tutorial post, and I'm really excited to share something fitting for the season with you. While trolling Pinterest recently I discovered a recipe at Sweet Verbena (originally from Big Red Kitchen) for some super easy pumpkin cupcakes. Texas doesn't exactly have ideal fall weather for a native Northerner like myself, so I've been craving a taste of true fall.

Now I must warn you all, although I like to cook, I'm not necessarily the most creative in the kitchen, so I need a recipe. And I know you all hear me when I say I'm tired at the end of a long day, and don't exactly feel like putting a lot of effort into food. This particular recipe struck me because it only calls for two ingredients. Yep, you read that right, TWO INGREDIENTS! Delicious pumpkin dessert for minimal effort from this worn out gal? Where do I sign up?

The two ingredients required for this recipe are yellow cake mix and pumpkin puree. I wanted something a little more special, and felt the need to ever so slightly push my culinary skills by adding to them. I chose to throw in a bag of chocolate chips and top them with some cream cheese frosting.


The actual recipe only called for a 15 oz. can of pumpkin puree, but of course, I forgot to check that before I went to the store, so I got the big can just to be safe and ended up scooping out half with a spoon. I also almost forgot cupcake liners, and later on almost forgot to add the chocolate chips into the mix. Like I said earlier, star chef I am not.

Luckily, it's pretty darn difficult to screw this recipe up. I just mixed together the above ingredients and ended up with this tasty-looking mix:


I'll admit that I stuck my finger in a few times because I was just way too excited to see how this was going to turn out. So far, so good! The next step, of course, is putting the mix in the cupcake tin. I eyeballed this, and since I only have a cupcake pan big enough for 6, I had a few tries to test out how much mix to put in. The first time I didn't quite put enough in and ended up with some relatively flat cakes. I'll also let you know that before putting them in the oven is when you should smooth them out, or you will get some pointy, bumpy cupcakes.


The ones on the bottom right and left probably turned out the best, so that is what you should aim for if you're unsure. After popping these babies in the oven at 350 for 20-25 patient anxious minutes, I discovered these beauties beaming up at me:


Success! The mix yielded exactly 18 cupcakes for me. It was so tempting to not just dive right in at this stage, but I had one last, important step to make these even more amazing: homemade cream cheese frosting. This time I pulled the recipe from my boyfriend's Baking and Pastry book from the Culinary Institute of America. That's right, I've got a chef in the house and I'm making cupcakes from 3 store-bought ingredients. Let's just say one of us is in love with cooking, and the other just kind of likes it. You decide which one I am. Anyway, although the recipe came from the CIA, it was also surprisingly easy and simple, having only 4 ingredients.


The recipe was for quite a large batch so I cut in in half, which worked out great. This means I used 4 oz of butter, 8 oz cream cheese, 1/2 tbsp vanilla extract, and half a cup of powdered sugar. After mixing them all together the frosting looked like this:


So, you could just frost them with a knife, but I was feeling like Fancy Nancy and I decided to try my hand at piping it onto the cupcakes. I'm pretty proud to say that I got a few to turn out decent enough, and my final product turned out a little something like this:


I hope you're inspired to try these cupcakes, they were totally worth it in my book! I'm about to go have one right now, but before I go I'll leave you with a break down of the recipes.

Pumpkin Cupcakes


1 box yellow cake mix
1 15 oz can of pumpkin puree
1 bag chocolate chips

Begin by preheating the oven to 350 degrees (this is usually something I forget until I've already made my mix). Stir all of the ingredients together until fully incorporated. Pour into cupcake tins. Bake for 20-25 minutes.


Cream Cheese Frosting

8 oz cream cheese
4 oz butter
1/2 cup powdered sugar
1/2 tbsp vanilla extract

Blend the cream cheese on low speed until smooth. Add the butter in stages, and blend well. Add the powdered sugar and blend on low speed until fully incorporated. Beat on high speed until light and fluffy, about 5 minutes. Blend in the vanilla. Cover and refrigerate until ready to use.




Thursday, September 15, 2011

In The Beginning...

Welcome to my inaugural post at HeArt and Haus! I suppose I should start by sharing a little about myself. I'm a young twenty-something with a natural inclination for talking and all things crafty. By day I'm a full time art teacher at a middle school, where I help kiddos explore their creativity, but in my free time I like to let my own creative juices flow.

Over the last year or so, I've come home from work and immediately producing fabulous art pretty much been exhausted coming home from school every night, so finding the motivation to do more "work" just made me even more tired. Come on, tell me you know what I mean! Because of my aforementioned "talents" (talking is a talent, I swear! Or at least I always told my mom that...) and my lack of incentive, I thought creating a blog to track my endeavors might just light a fire under my little rump and get me going!

Through this blog I hope to cover tons of different types of DIY projects from creating art, to sewing, decorating, even cooking. May God bless my boyfriend for having to test out the latter (I'm actually not too bad, as long as a follow a recipe I'm confident I can handle, but he still sweetly tells me it's always good). Basically, my daily creative life. So, thanks for joining me on my soon-to-be adventures in blogging and arting!